Difference between revisions of "LoyaltyUserGuide"
| Line 1: | Line 1: | ||
<h2>Loyalty – Administration and Configuration</h2> | <h2>Loyalty – Administration and Configuration</h2> | ||
| − | <h3>Configuration | + | <h3>Configuration the application</h3> |
Go to «Opportunity Page Layout». To the "Opportunity Detail" section add the "Loyalty Program" field. | Go to «Opportunity Page Layout». To the "Opportunity Detail" section add the "Loyalty Program" field. | ||
Revision as of 07:53, 21 July 2017
Contents
- 1 Loyalty – Administration and Configuration
- 1.1 Configuration the application
- 1.2 Configuration of the functionality of work with the order
- 1.3 A loyalty program creation
- 1.4 The loyalty program members creation
- 1.5 The loyalty program points types creation
- 1.6 Creation of the loyalty program member levels
- 1.7 Loyalty program promotional offers setting
- 1.8 Application settings
- 2 Loyalty – in Action
- 2.1 Opportunity product discount calculation
- 2.2 Creation of the transaction while closing the opportunity
- 2.3 Order product discount calculation
- 2.4 Creation of the transaction while activating the order
- 2.5 Obtaining the level by the member of the loyalty program
- 2.6 The use of the promotional offers in the opportunity
- 2.7 The use of the promotional offers in the order
Loyalty – Administration and Configuration
Configuration the application
Go to «Opportunity Page Layout». To the "Opportunity Detail" section add the "Loyalty Program" field.
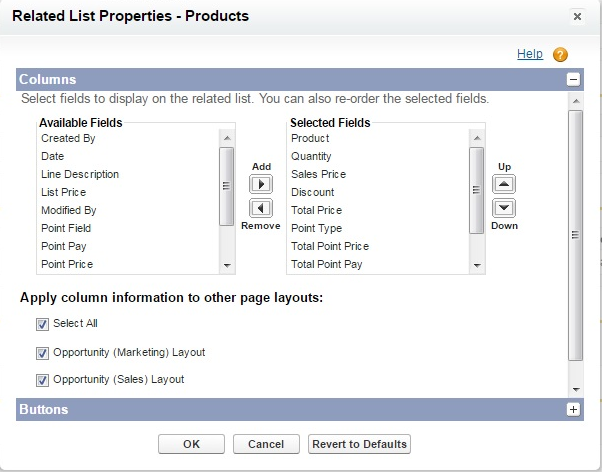
Go to the "Products Related Lists" settings.
Add the following fields to the displayed ones:
«Discount» - amount of discount;
«Point Type» - the type of points selected for payment of the product;
«Total Point Price» - the total price of points of the selected type required for the purchase of the product;
«Total Point Pay» - the total amount of money funds required for the purchase of the product;
«Member`s Point» - the number of points of the selected type available with the customer;
«Pay by Points» - the flag of payment for the product using the selected type of points.
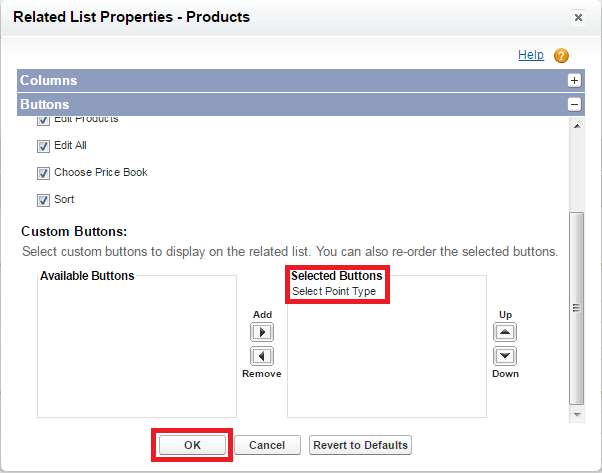
Add the "Select Point Type" button displaying and save the settings for "Products Related Lists" with the "OK" button.
Save the "Opportunity Page Layout" settings with the "Save" button.
If the "Discount" field is not displayed in "Products Related Lists", it is necessary to configure access to this field for the profiles whose users will be working with the application. Go to the "Opportunity Product Fields" screen and click the hyperlink in the "Discount" field.
On the "Discount" field properties screen click the "Set Field-Level Security" button.
Set the "Visible" and "Read-Only" attributes for the profiles required by the users and save changes with the "Save" button.
Configuration of the functionality of work with the order
Go to «Order Page Layout». To the "Order Detail" section add the "Loyalty Program" field.
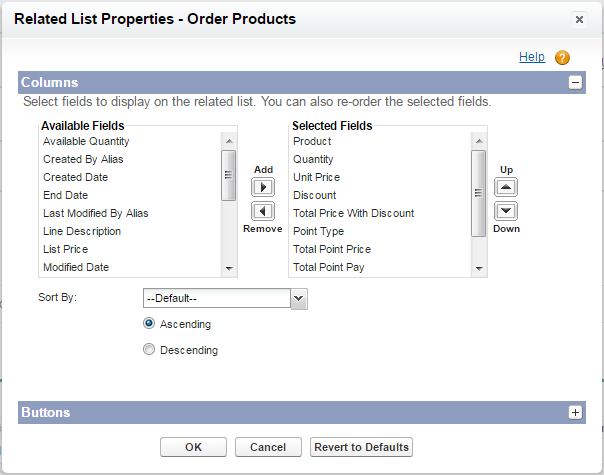
Go to the «Products Related Lists» settings.
Add the following fields to the displayed ones:
«Discount» - amount of discount;
«Point Type» - the type of points selected for payment of the product;
«Total Point Price» - the total price of points of the selected type required for the purchase of the product;
«Total Point Pay» - the total amount of money funds required for the purchase of the product;
«Member`s Point» - the number of points of the selected type available with the customer;
«Pay by Points» - the flag of payment for the product using the selected type of points;
«Total Price With Discount» - the total amount of money funds required for the purchase of the product, taking into consideration the discount accrued.
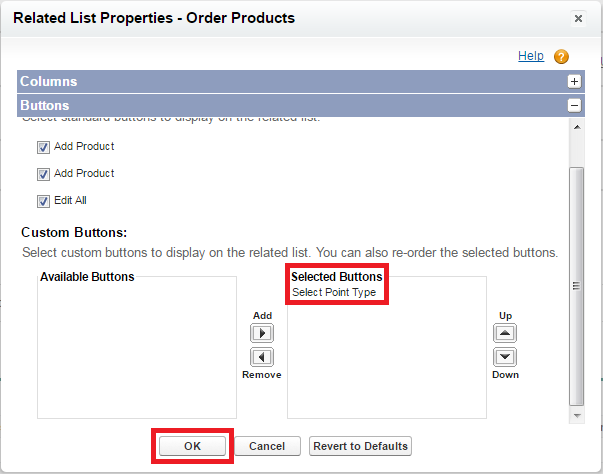
Add the "Select Point Type" button displaying and save the settings for "Products Related Lists" with the "OK" button.
Save the «Order Page Layout» settings with the «Save» button.
Go to "Administer – Manage Users – Profiles" and create a custom profile for users (for example, clone "Standard User" profile). Then set object permissions in "Custom Object Permissions" section.
Set Tab access in section "Tab Settings - Custom Tab Settings".
A loyalty program creation
Go to the "Loy Programs" tab and click the "New" button.
Specify the name of the loyalty program being created and save the entry with the “Save” button.
Follow the hyperlink in the field with the name of the loyalty program created.
To create a new loyalty program rule, click the “New Loy Rule” button in the “Loy Rules” section.
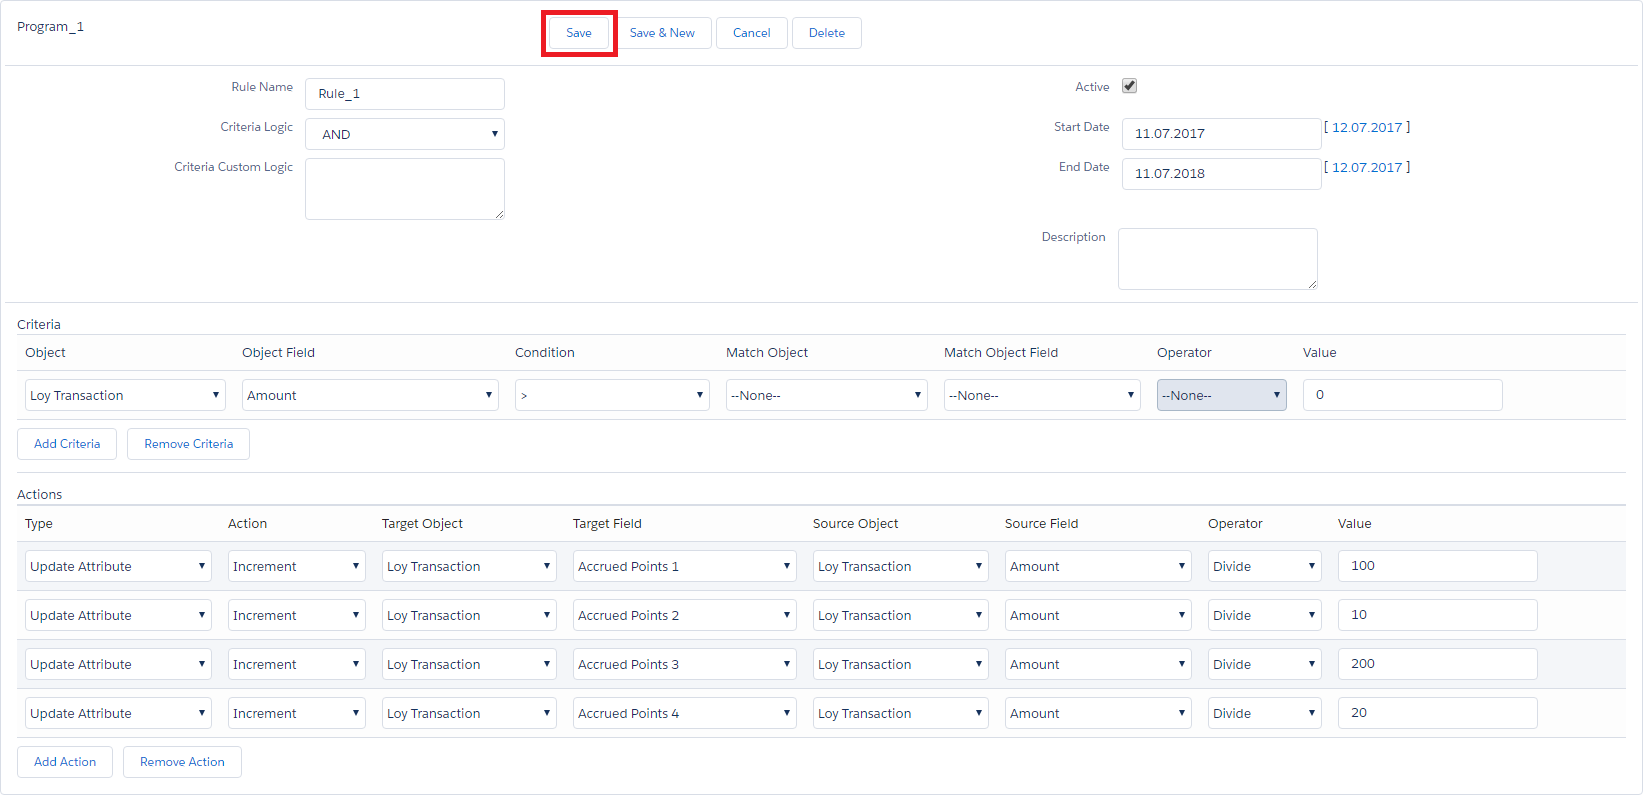
In the “Rule” section, fill in the following attributes for the rule being created:
«Rule Name» - the name of the rule;
«Criteria Logic» - the type of logic being used for the combination of the rule criteria;
«Criteria Custom Logic» - not used (for further development of the functional);
«Active» - the flag of activity of the rule (the rule is used provided that this flag is set);
«Start Date» - the rule start date;
«End Date» - the rule end date;
«Description» - rule description.
The attributes "Start Date" and "End Date" determine the validity period of the active rule (i.e. the rule with the "Active" flag set).
In the "Criteria" section, with the "Add Criteria" button, create the required criteria for application of the rule and fill in the following attributes:
«Object» - the object whose fields will be used in the criterion;
«Object Field» - the object field name given by the "Object" attribute;
«Condition» - the type of relation between the attributes being compared;
«Match Object» - the object for comparison whose fields will be used in the criterion;
«Match Object Field» - the name of the object field for the comparison given by the "Match Object" attribute;
«Operator» - the operator being used to complete operations on the "Match Object Field" and "Value" attributes;
«Value» - the numeric value which is used as an operand in the operation with the "Match Object Field" attribute (if this attribute is not given, this value is used to be compared with the "Object Field" attribute).
The screenshot example shows that the given criterion works as follows: if the value in the "Amount" field (purchase amount) of the "Loy Transaction" object (transaction) is greater than "0", then apply the actions specified in the rule.
In the "Actions" section, with the "Add Action" button create the required actions (which should be performed if the set of rule criteria is satisfied) and fill in the following attributes:
«Type» - the type of action (possible values: “Update Attribute”, “Upgrade Tier”);
The “Upgrade Tier” value is not used (further development of the functional).
«Action» - action (possible values: "Assign" - appoint, "Increment" - increase);
«Target Object» - the target object whose fields will be used;
«Target Field» - the object field name given by the "Target Object" attribute;
«Source Object» - the source object whose fields will be used;
«Source Field» - the object field name given by the "Source Object" attribute;
«Operator» - the operator being used to complete operations on the "Source Field" and "Value" attributes;
«Value» - the numeric value which is used as an operand in the operation with the "Source Field" attribute (if this attribute is not given, this value is used in the operation (given by the "Action" attribute) with the "Target Field" attribute).
The screenshot example shows that the given actions work as follows:
- increase the value in the "Accrued Points 1" field (the number of points of the 1st type) of the "Loy Transaction" object (transaction) by the amount equal to the result of division of the value in the " Amount " (purchase sum) field (purchase amount) of the "Loy Transaction" object (transaction) to "100";
- increase the value in the "Accrued Points 2" field (the number of points of the 2nd type) of the "Loy Transaction" object (transaction) by the amount equal to the result of division of the value in the " Amount " field (purchase sum) of the "Loy Transaction" object (transaction) by "10";
- increase the value in the "Accrued Points 3" field (the number of points of the 3rd type) of the "Loy Transaction" object (transaction) by the amount equal to the result of division of the value in the " Amount " field (purchase sum) of the "Loy Transaction" object (transaction) by "200";
- increase the value in the "Accrued Points 4" field (the number of points of the 4rth type) of the "Loy Transaction" object (transaction) by the amount equal to the result of division of the value in the " Amount " field (purchase sum) of the "Loy Transaction" object (transaction) by "20";
Description of the types of points and their determination for the loyalty program will be specified in this document below.
To save the created rule click the "Save" button.
The loyalty program members creation
Go to the “Loy Member” tab and click the “New” button.
Specify the loyalty program, account and the date of joining for the new member. If necessary, it is possible to specify the starting number of each type of the points. Then save the entry with the "Save" button.
The loyalty program points types creation
Click the "Loy Points" tab and click the "New" button.
Fill in the following attributes:
«Name» - points type name;
«Program» - the loyalty program for which this type of points is being created;
«Description» - points type description;
«Qualifying Flag» - the flag that this type of points is "qualified" (i.e. is taken into consideration when determining the level of the user in the loyalty program);
«Active» - the flag of activity of the type of points (the application uses in its work only the active types of points);
«Field to Use» - an identifier determining the field on the object of the member (Loy Member) and transaction (Loy Transaction) being used to store the number of accrued points of this type. For example, if the value "1" is specified, the "Points 1" field of the object of the member and the "Accrued Points 1" field of the transaction object will be used to store this type of points. It is impossible to use the same identifier for the different types of points (the restriction is controlled by the application). The application supports up to 4 different types of scores;
«Expire Points» - the flag of availability of the validity period of this type of points (if the points expire, they will be dissolved). This flag is applied only to the non-qualified types of points. For the qualified points, a similar flag, placed on the member level object is used (Loy Tier) and will be described below;
«Points Expire Period» - the validity period of the type of points;
«Points Expire UoM» - a measuring unit for determination of the validity period of the type of points specified in the "Points Expire Period" attribute (possible values: "Months", "Years").
Save the created entry with the "Save" button.
The screenshot example below shows where the maximum number of (4-re) different types of points is created. Two of them ("Point 1" and "Point 3") are qualified, and two more ("Point 2" and "Point 4") are non-qualified and have a validity period (6 months and 1 year respectively). The non-qualified types of points are not involved into the formation of the user level in the loyalty program, but can be used by the member to purchase promotional products (this will be described below). The qualified types of points are used exclusively for the formation of the member level and cannot be used to purchase promotional products.
Creation of the loyalty program member levels
Go to the "Loy Tiers" tab and click the "New" button.
Fill in the following attributes:
«Name» - member level name;
«Program» - the loyalty program for which this type of points is being created;
«Description» - member level description;
«Expire Points» - the flag of availability of the validity period of the qualified points accrued to the member at this level (if the points expire, they will be dissolved);
«Points Expire Period» - «Months», «Years»); the validity period of the qualified types of points accrued to the member at this level;
«Points Expire UoM» - a measuring unit for determination of the validity period of the type of points specified in the "Points Expire Period" attribute (possible values: "Months", "Years");
«Lower End Of The Range» - the lower limit of the level range (the value is included in the range);
«Upper Limit Of The Range» - the upper limit of the level range (the value is excluded from the range);
The ranges of different levels within the single loyalty program should not overlap (this condition is controlled by the application).
«Discount» - the amount of discount provided for the member at this level.
Save the created entry of the member level with the "Save" button.
The screenshot below shows one of the possible examples of organization of the levels structure of the loyalty program member.
To provide correct operation of the functional, there should be no gaps between the levels within the single loyalty program.
Loyalty program promotional offers setting
Go to the "Loy Point Products" tab and click the "New" button.
Fill in the following attributes:
«Name» - promotional offer name;
«Payment Mode» - the type of payment (possible values: "Points", "Points + Pay");
«Pay» - the amount of money funds required for the purchase of the product (should be filled in if the "Payment Mode" attribute is filled with the "Points + Pay" value);
«Points» - the number of points of the selected type (given by the «Point Type» attribute), required for the purchase of product;
«Point Type» - the type of non-qualified points (while selecting the value, the application controls the availability of the non-qualified types of points only), which will be used in this promotional offer;
«Product» - the product being used in this promotional offer.
Save the created entry of the promotional offer with the "Save" button.
The screenshot example below shows two promotional offers: one with the "Points" type and the other one with the "Points + Pay" type.
Application settings
Go to the configuration tab "Loy Settings" and edit the application settings, if necessary.
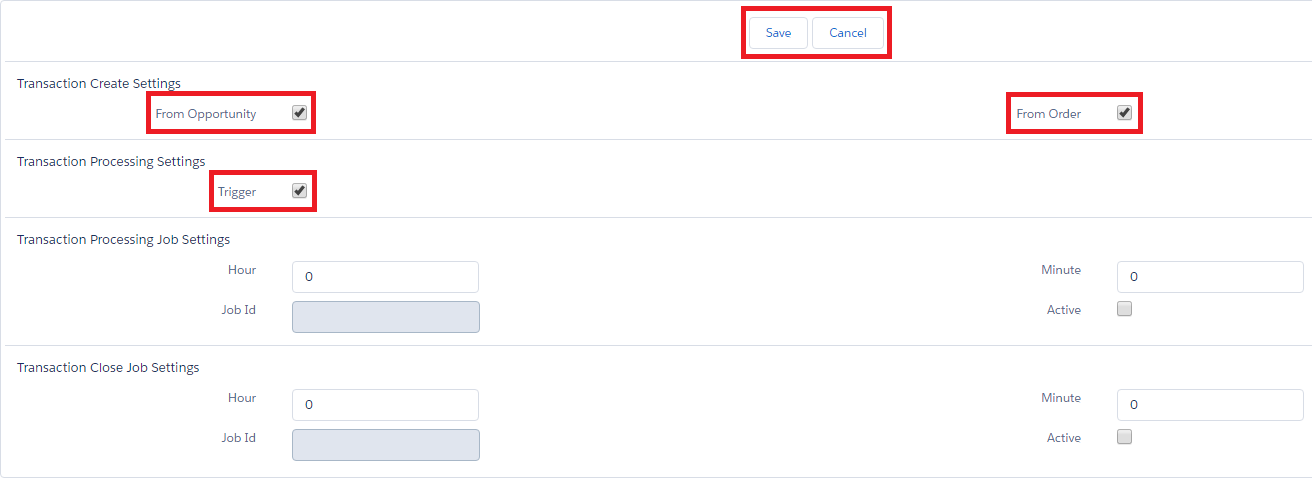
From Opportunity – includes application functionality for the Application. If this flag is set, while adding the product to the order, the discount will be calculated, and transactions will be generated while transferring the application to the "Closed Won" status.
From Order – includes the functionality of the application for the Order. If this flag is set, while adding the product to the order, the discount will be calculated, and transactions will be generated if the order is activated.
Trigger – includes the functionality of the transaction processing by the trigger. If this flag is set, the transactions with the status "Queued" will be processed immediately after creation or transition to the specified status. Otherwise, the periodic task should be run for the transaction processing (the trigger method is described below).
To changes, click the "Save" button. To cancel changes made, click the "Cancel" button (the information on the tab will be updated with the data saved in the system).
The application provides two working modes:
- transactions processing in the trigger mode - upon creation of the transaction in the "Queued" status or changing the transaction status to the "Queued" value;
- transactions processing in the "Queued" status in the mode of periodic task being performed with the given periodicity (for example, once a day - at the scheduled time).
It is necessary to perform the following actions from the configuration page to switch to the periodic task mode:
in the «Transaction Processing Settings» section
- deactivate the transactions trigger processing by disabling the "Trigger" option;
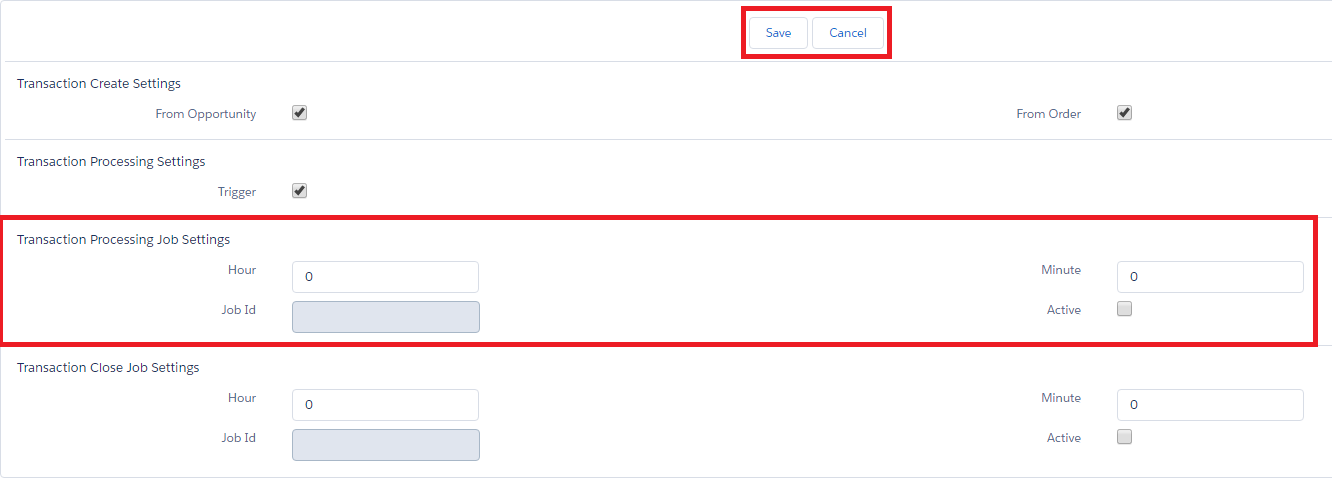
in the «Transaction Processing Job Settings» section
- specify the hour of the task performance (the "Hour" attribute is able to take values in the range of 0-23);
- specify the minute of the task performance (the "Minute" attribute is able to take values in the range of 0-59);
- disable «Active» option;
- click the "Save" button to save the changes, disable the trigger and start the periodic task.
Once started, the periodic task will be performed once a day at the time specified in the settings.
It is necessary to take the following steps to switch back to the trigger mode:
in the «Transaction Processing Job Settings» section
- disable «Active» option;
in the «Transaction Processing Settings» section
- activate the transactions trigger processing, enabling the "Trigger" option;
- click the "Save" button to save the changes, stop the periodic task and activate the trigger.
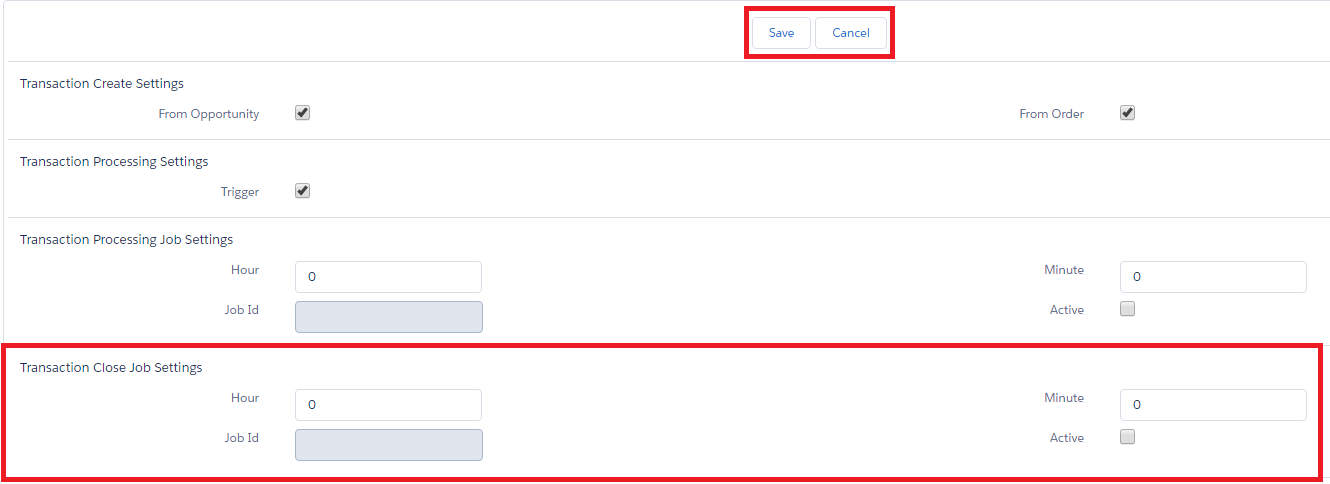
To deactivate the expired points and to update information on the available points of different types on the transactions and loyalty program members, it is necessary to take the following steps in the "Transaction Close Job Settings" section of the configuration page:
- specify the hour of the task performance (the "Hour" attribute is able to take values in the range 0-23);
- specify the minute of the task performance (the "Minute" attribute is able to take values in the range 0-59);
- enable «Active» option;
- click the "Save" button to save the changes and start the periodic task.
Once started, the periodic task will be performed once a day at the time specified in the settings.
It is necessary to take the following steps in the "Transaction Close Job Settings" section of the configuration page to disable the periodic task:
- disable the «Active» option;
- click the "Save" button to save the changes and stop the periodic task.
Loyalty – in Action
Opportunity product discount calculation
With the use of the configuration page, make sure that the application functionality for the Opportunity object is enabled.
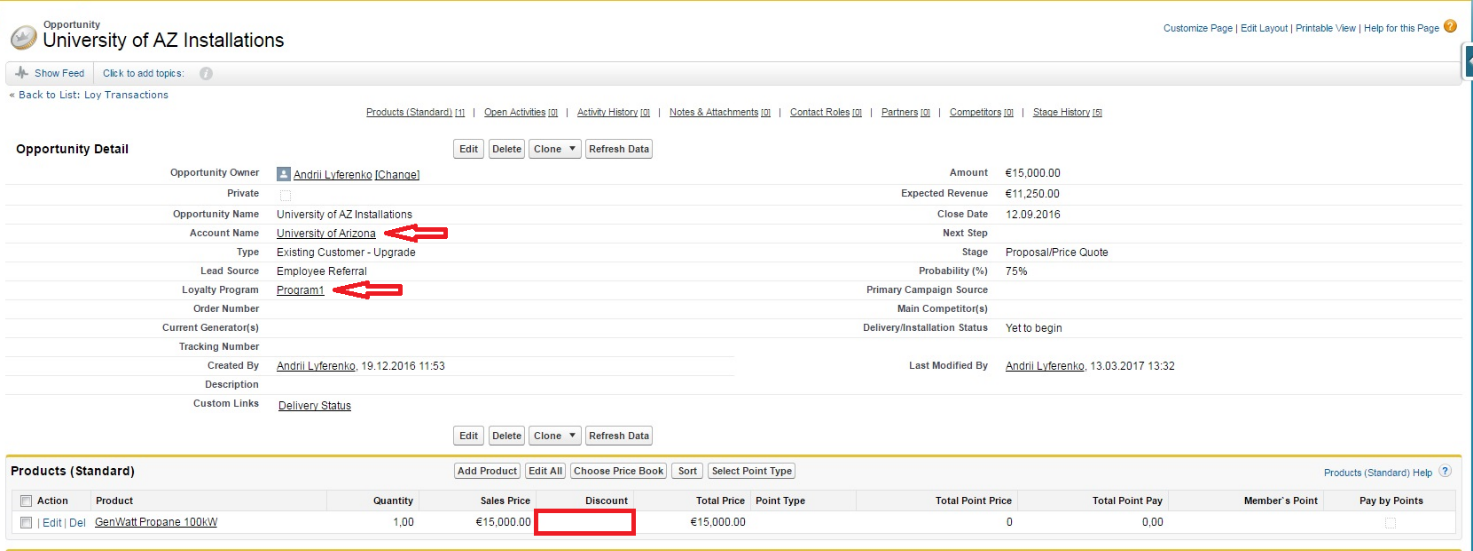
Create the opportunity. The "Account Name" attribute should be filled in with the value related to the one of the members of the loyalty program. The "Loyalty Program" attribute should be filled in with the value of the corresponding loyalty program. Then, add one or more products to the opportunity and make sure that the "Discount" attribute of the opportunity product is filled in and corresponds to the current level of the loyalty program member.
If the member (determined by means of the value in the "Account Name") of the loyalty program selected in the opportunity does not have the level of the loyalty program, the discount will not be accrued. Thus, in the example below the discount was not calculated, since this member is new and hasn’t purchased yet.
Creation of the transaction while closing the opportunity
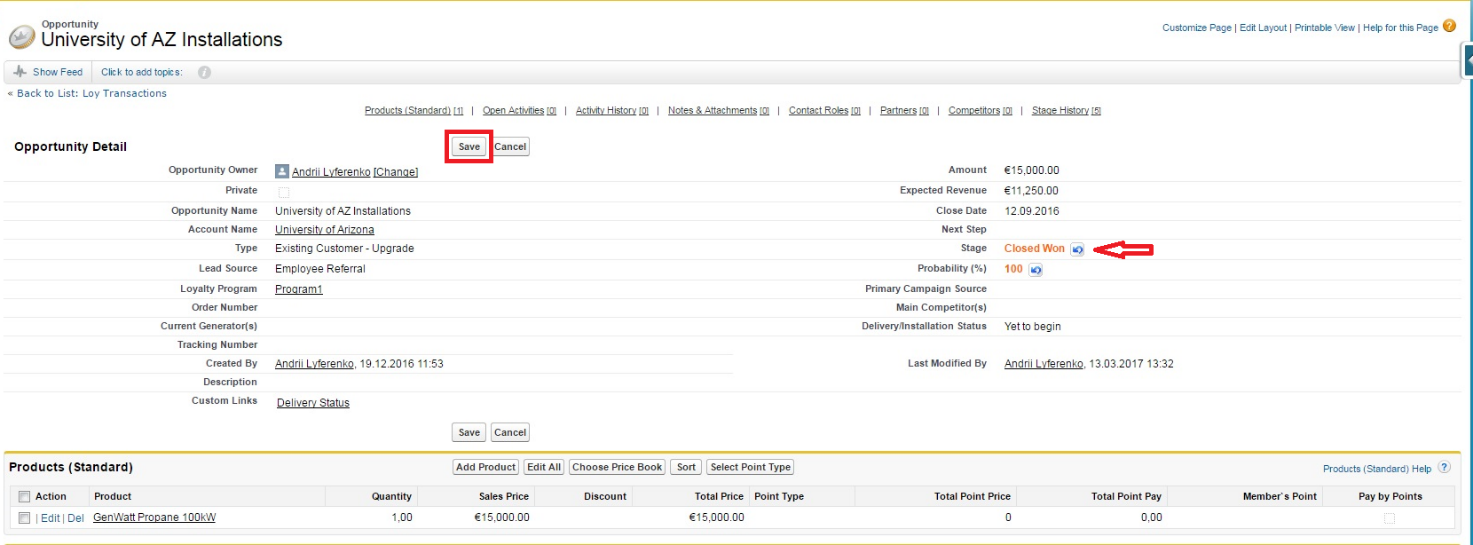
Change the status of the opportunity to "Closed Won" and save changes with the "Save" button.
Go to the "Loy Transactions" tab and make sure that upon closing of the opportunity the transaction in the name of the member of the loyalty program was created.
Order product discount calculation
With the use of the configuration page, make sure that the application functionality for the Order object is enabled.
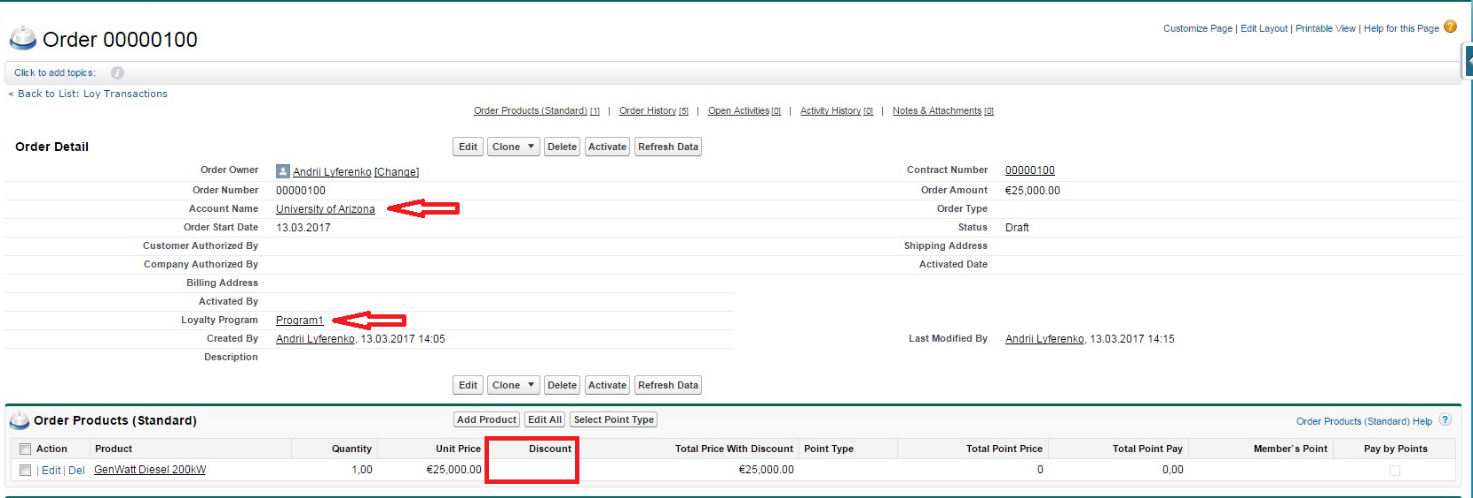
The "Account Name" attribute should be filled in with the value related to the one of the members of the loyalty program. The "Loyalty Program" attribute should be filled in with the value of the corresponding loyalty program. Then, add one or more products to the order and make sure that the "Discount" attribute of the order product is filled in and corresponds to the current level of the loyalty program member.
If the member (determined by means of the value in the "Account Name") of the loyalty program selected in the order does not have the level of the loyalty program, the discount will not be accrued. Thus, in the example below the discount was not calculated, since this member is new and hasn’t purchased yet.
Creation of the transaction while activating the order
Activate the order by the "Activate" button.
Go to the "Loy Transactions" tab and make sure that upon activation of the order the transaction in the name of the member of the loyalty program was created.
Obtaining the level by the member of the loyalty program
Go to the detailed information screen of one of the members of the loyalty program, for which one or more transactions were created and processed earlier. The "Points X" attributes specify the number of points of the corresponding type accrued to the member of the loyalty program.
In the "Loy Member Tiers» linked list you will see the entries specifying the history of granting the levels to the given member.
The entry attributes have the following meaning:
«Name» - the name of the level granted;
«Active» - the flag of the active entry, corresponds to the current level of the member (only one entry in the linked list can have this flag);
«Start Date» - the date of the level granting;
«End Date» - the date of the level deactivation.
Granting the new level to the member automatically deactivates the current level.
The use of the promotional offers in the opportunity
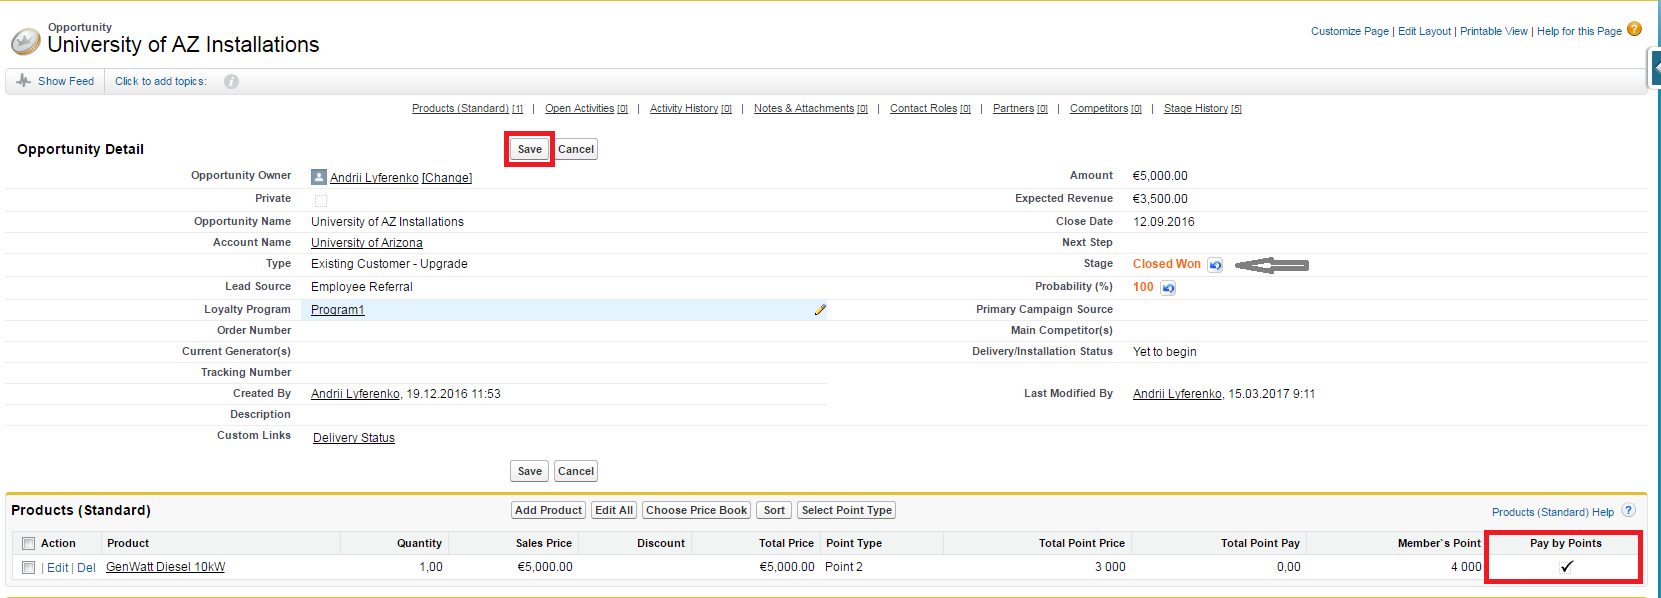
Add one of the products related to the promotional offer to the opportunity. In the screenshot example this will be like "GenWatt Diesel 10kW". Click the "Select Point Type" button.
In the "Point Type" field, from the list, select the type of points for payment of the promotional product. In the screenshot example this is "Point 2". Click the "Save" button to save the data and get back to the opportunity screen. The "Cancel" button gets you back to the opportunity screen with the changes loss.
Make sure that the following attributes in the opportunity product are filled in:
«Point Type» - the type of points selected for payment of the promotional product;
«Total Point Price» - the total number of points of the selected type required for payment of the promotional product;
«Total Point Pay» - the total amount of money funds required for payment of the promotional product (the promotional products payment scheme "Points + Pay" means the complex cost including points and money funds);
«Member`s Point» - the number of points of the selected type, currently available with the loyalty program member;
«Pay by Points» - the flag of payment of the promotional product using the selected type of points (it is set automatically while selecting the type of points for payment of the product and provided that the member has an adequate number of points of the selected type to pay the product).
If the "Pay by Points" flag is not set once the points selected, check whether the member`s current number of points of the selected type (specified in the "Member's Point" attribute) is adequate to pay for the promotional product (the amount of points required for payment is specified in the " Total Point Price" attribute).
The purchase of the promotional product will be done using the loyalty points only if the "Pay by Points" flag is installed.
Make sure that the purchase of the promotional product using the loyalty points is possible (the "Pay by Points" flag on the opportunity product should be activated), then change the status of the opportunity to "Closed Won" and save changes with the "Save" button. In such a case, for the opportunity products with the "Pay by Points" flag, the previously accrued discount will be deleted and the "Unit Price" attribute will be updated pursuant to the "Total Point Pay" value.
If upon closing the opportunity you got an error message like: "Not enough points with type <Point Type> for payment the product <Product Name>. Please, actualize data by re-select point type in opportunity <Opportunity Name>», it is necessary to click the "Select Point Type" button and then in the window for selecting the type of points, click the "Save" button to update the opportunity data. After that, the data of the "Member's Point" and "Pay by Points" attributes of the opportunity products will be updated. Updating the specified product attributes is impossible for the opportunities with the statuses: "Closed Won", "Closed Lost".
This kind of situation is possible if in the interval between selecting the type of points for purchase and closing the opportunity the number of the selected points of the member has been changed (for example, the points were used for another purchase or decreased due to expiration).
Go to the "Loy Transactions" tab and make sure that after the opportunity closing, a new transaction has not appeared. Upon purchasing the promotional product the transaction is not formed. If the opportunity contains several products, the transactions are formed only for those that do not have the active "Pay by Points" flag. Also consider that the values in the "Used Points 2" field have appeared (used points of the second type, which was selected for payment of the promotional product). All 2500 previously accrued points were written off from the one transaction, and 500 of 1500 previously accrued points from the other one. In the aggregate, this corresponds to the number of points spent on the purchase of the promotional product.
Go to the detailed information screen of the loyalty program member for which the order was drawn up. Make sure that the value in the "Points 2" field (the number of points of the second type, which was selected for payment of the promotional product) decreased by the amount of the points used. Upon purchasing, the member had 4000 points of "Point 2" type. 3000 points were used to purchase the promotional product. The total balance of points of this type was 1000 points.
The use of the promotional offers in the order
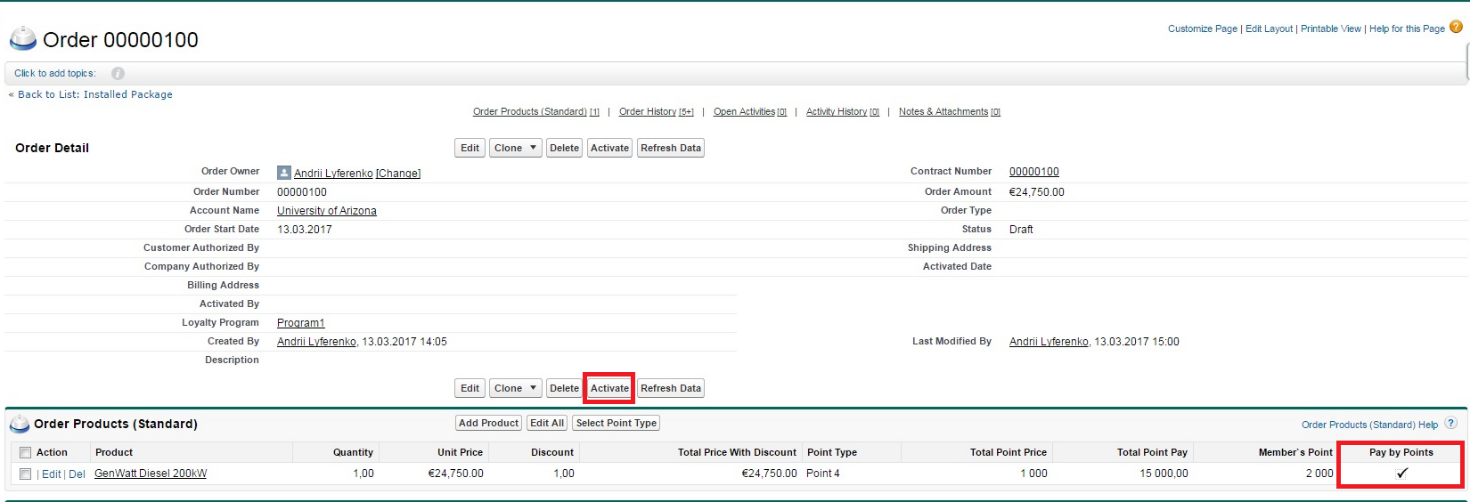
Add one of the products related to the promotional offer to the order. In the screenshot example this will be like "GenWatt Diesel 200kW". Click the "Select Point Type" button.
In the "Point Type" field, from the list, select the type of points for payment of the promotional product. In the example in the screenshot, this is "Point 4". Click the "Save" button to save the data and get back to the order screen. The "Cancel" button gets you back to the order screen with the changes loss.
Make sure that the following attributes in the order product are filled in:
«Point Type» - the type of points selected for payment of the promotional product;
«Total Point Price» - the total number of points of the selected type required for payment of the promotional product;
«Total Point Pay» - the total amount of money funds required for payment of the promotional product (the promotional products payment scheme "Points + Pay" means the complex cost including points and money funds);
«Member`s Point» - the number of points of the selected type, currently available with the loyalty program member;
«Pay by Points» - the flag of payment of the promotional product using the selected type of points (it is set automatically while selecting the type of points for payment of the product and provided that the member has an adequate number of points of the selected type to pay the product).
If the "Pay by Points" flag is not set once the points selected, check whether the member`s current number of points of the selected type (specified in the "Member's Point" attribute) is adequate to pay for the promotional product (the amount of points required for payment is specified in the " Total Point Price" attribute).
The purchase of the promotional product will be done using the loyalty points only if the "Pay by Points" flag is installed.
Make sure that the purchase of the promotional product using the loyalty points is possible (the "Pay by Points" flag on the order product should be activated), then activate the order with the "Activate" button. In such a case, for the order products the "Pay by Points" flag, the early accrued discount will be deleted and the "Unit Price" attribute will be updated pursuant to the "Total Point Pay" value.
If upon activating the order you got an error message like: "Not enough points with type <Point Type> for payment the product <Product Name>. Please, actualize data by re-select point type in order <Order Name>», it is necessary to click the "Select Point Type" button and then in the window for selecting the type of points, click the "Save" button to update the order data. After that, the data of the "Member's Point" and "Pay by Points" attributes of the order products will be updated. Updating the specified product attributes is impossible for the activated orders.
This kind of situation is possible if in the interval between selecting the type of points for purchase and activating the order the number of the selected points of the member has been changed (for example, the points were used for another purchase or decreased due to expiration).
Go to the "Loy Transactions" tab and make sure that after the order activation, a new transaction has not appeared. Upon purchasing the promotional product the transaction is not formed. If the order contains several products, the transactions are formed only for those that do not have the active "Pay by Points" flag. Also consider that the values in the "Used Points 4" field have appeared (used points of the fourth type, which was selected for payment of the promotional product). 1000 of 1250 previously accrued points were written off from the one transaction. This corresponds to the number of points spent on the purchase of the promotional product.
Go to the detailed information screen of the loyalty program member for which the order was activated. Make sure that the value in the "Points 4" field (the number of points of the second type, which was selected for payment of the promotional product) decreased by the amount of the points used. Upon purchasing, the member had 2000 points of "Point 4" type. 1000 points were used to purchase the promotional product. The total balance of points of this type was 1000 points.


